

Create a felted cute cloche, that’s fun and cute to wear.
Before I learned to spin yarn, I made ladies’ hats; this led to felting embellishments, hats and other explorations with wool. Felting isn’t hard to do – it’s time consuming, yet very rewarding. These days, everything is NOW, and it’s easy to feel like you’re on overload. Moving back to hands-on crafts is relaxing, fun and cheaper than therapy!
Hats are very flattering, plus they are fun to wear. Popular show such as Downton Abbey always make me want to wear hats, and this vintage-inspired cloche style is reminiscent of what you might see one of the characters wearing. I love wearing hats, and I admit I probably should wear them more.
For those of you new to felting, water, soap and friction (rubbing, etc.) is what makes the felting process happen. Felting is a really fun activity which anyone can enjoy (even little ones!). This project doesn’t require a great deal of supplies: depending on the materials you choose, you can make the hat for around $20-$40. You could use wool roving, a plastic or cardboard resist, and soap because you will be flat felting two sandwiched sections around a resist. Then, after the wool felts enough to pick up and handle-you remove the resist. If you are feeling a little intimidated, fear not – this post will take you through the process step-by-step, and it will make sense as you view the photos below.
I used a basic brown merino, since merino wool felts fastest and it is my preferred fiber to felt with! After I made the hat, I decided it was a little tame, so I dyed it black (because, you know black goes with everything). I recommend picking a color that flatters you, although black is great on everyone.

The materials I used to felt my hat.
Skills Needed: Patience, basic sewing, and approx. 3 hours of time
Supplies:
*3.8 oz merino batts, or roving
*matchstick blind, bubble wrap, or textured shelf liner
*2 yards bridal tulle-aids in felt not sticking to the blind
*liquid dish soap
*sewing needle, thread, scissors, straight pins
*millinery grosgrain ribbon
*measuring tape
*resist (made of cardboard or thick plastic-see below)
Optional Supplies:
sewing machine (you may also sew in the headsize band by hand)
hat block (you can use a bowl in a pinch)
ridged wood block
soap saver-ridged bendy tool for shaping thick cord
iron (with steam function)
To make your resist: it is easy to make out of thick plastic or cardboard. The resist should be bell shaped and a bit flared at the bottom. Follow my sketch below to make your resist template:

Once you have your resist made, you can get started!
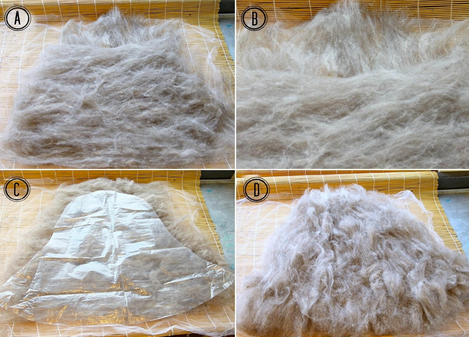
Fig A: Lay out your tulle, matchstick blind, and two layers of wool. Batts are handy-for felting larger items. Mine peeled apart in layers. Roving take a little patience, place wool evenly.
As seen in Fig B, you must lay your wool in two directions: horizontal one way, and vertical in the other. This aids in felting. Lay the wool about 2” bigger than the resist.
Fig C: Add your resist, then repeat another layer of wool, same as the base (Fig D). You’re making a felt “sandwich” with the resist in the middle. Dribble a tiny amount of liquid soap over the wool. Go easy, since you don’t want a big soapy mess. About 4 small drops of liquid should be enough.
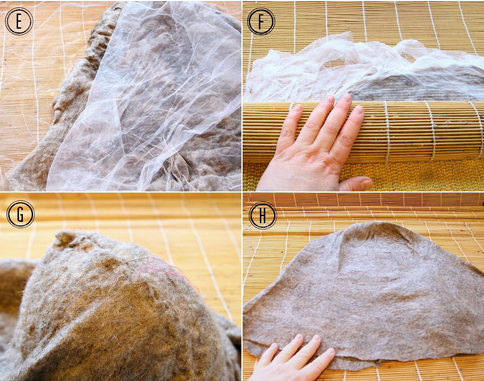
Fig E: Gently fold the seam edges of the wool over the resist. Then sprinkle water on to moisten the wool (but try not to drench it). If there’s too much water, you can squeeze it out later.
Fig F: Place another layer of tulle on top of the felt, and roll up the matchstick blind. Roll like you’re making dough-for about 3 minutes. Check the hat, see if any of the seam edges have migrated. Continue to roll. Then turn the project, and roll in another direction. Whatever direction you roll, or rub, the hat will shrink in that direction. Keep rolling, and rubbing. Test for “felt” where it feels like the wool is stiffening up. Repeat…and when it gets felted enough, you can remove the resist! (Note: The active felting time can take up to 45 minutes)
Fig G: Oops! Invariably, a ridge might happen on the hat seam. Don’t sweat it. I laid my hat on the hat block, and stitched down the bumpy parts, then continued to roll, and rub. Then I turned my hat inside out to hide it (Fig H). See, there’s always a solution!

Fig I: This is one way to rub the hat in order to further felt it. Presumably, now you have something remotely hat-shaped: if it’s looking like a bell,you’re heading in the right direction! Now is the time to try it on. If it’s still a bit too big, rub side to side so it shrinks. When it fits the way you want it to, wring the hat out and rinse the soap from it, then put it between two old towels to remove the excess water.
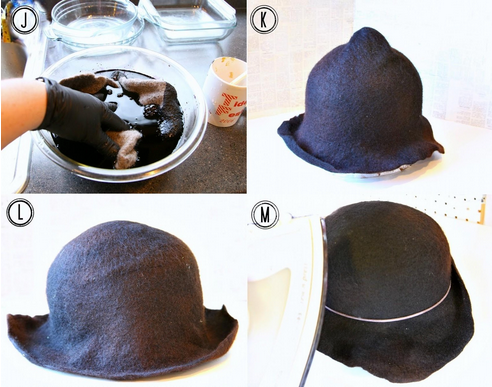
I decided to dye my hat black (Fig J). Ideally, you would pick the color of wool you want the hat to be at the start of your project, but sometimes you have a change of heart along the way! I dyed my hat in a glass bowl using acid dye; then I used my microwave on high for 10 minutes to set the dye.
Figs K-M: Use the bowl as a blocking device to shape your hat. You can use steam from an iron to help flatten out the crown tip. Using the thick cord placed about halfway down the hat block, I made a sweatband crease, which is where the optional sweatband will go. I highly recommend taking this extra step because sweatbands are an excellent buffer between you and the wool – this way your forehead won’t itch!
To add your sweatband, you can either sew it in with a sewing machine (a little tricky) or sew it in by hand, which might be easier, depending on your sewing skills and confidence. If it doesn’t work, pull the stitches out and start over!

Fig N: Cut your grosgrain ribbon to fit; you can measure your head by wrapping the tape measure around and choosing an area where the hat would rest naturally. I usually take my measurements at about an inch above the eyebrows, and just over the ears. Add two inches to your overall head measurement to determine the length you should cut the grosgrain ribbon.
Using an iron, “curve” the grosgrain ribbon to make it easier to sew into the hat. It will flex, because millinery grosgrain has flexible edges. Fold the ribbon end over, and pin the 2inches under. Test to see if it fits your head, then divide into fourths, making with a pin (Fig O).
Fig P: Pin equally into the inside of the hat on the sweatband crease.
Fig Q: Slowly sew the sweatband using a sewing machine, or by hand. Sewing with a machine will give it a neater appearance. You may match the grosgrain ribbon with the thread to match the hat, on in this example, I used black thread for the bobbin to match the black felt.
 I chose to cut my hat brim down some: I made it 1 inch in the back and slowly tapered to about 2 inches in the front. I used a piece of white chalk to mark the space where I needed to cut, then used a pair of very sharp scissors to cut it, saving a piece of felt to use for the hat band embellishment. To see how I make a rosette motif with art yarns, click here for instructions. Otherwise, enjoy your hat without ornament!
 Sayra Adams (formerly known as Hatdiva) started making fanciful, romantic ladies’ hats in 1991. Her innate gift using color led to many fun hat designs. After years of dyeing silks and fashioning straw hats, she switched gears and began felting with wool…and an obsession for all things wool began! You can follow her fibery exploits at www.atomicbluefiber.com.

Thanks so much for these awesome directions!
I really learned a lot from this tutorial. Thanks for the detailed instructions. This gave me so many ideas for hats for my grand-babies.